Citations and bibliographies
Write-N-Cite
Write-N-Cite is a utility that allows users to run an abbreviated version of RefWorks in Microsoft Word. You can access your references by folder (or sub-folder), by quick search or by all references with the ability to sort by author, title or year.
With Write-N-Cite, you can cite references in a manuscript with just a click and watch your paper format instantly including in-text citations, footnotes and your bibliography. The utility installs a RefWorks tab in the MS Word ribbon or you can access it from the References tab in Microsoft Word.
You can work both online or offline and you can share documents between the Windows and Mac versions of Write-N-Cite seamlessly.
Instructions for Installing Write-N-Cite:
- Windows Version
- Mac Version (forthcoming)
Working with Write-N-Cite
Step 1. Launch Write-N-Cite
Note: The first time you launch Write-N-Cite, you must be connected to the internet in order to log in to your RefWorks library and sync it with Write-N-Cite.
Tip: In most cases, there is no need to log out of Write-N-Cite when you are not using it. If you are using Write-N-Cite on a public computer without a personal login, you should log out of Write-N-Cite when you complete your work. If someone does gain access to a system with your RefWorks library logged in to Write-N-Cite, they will not be able to change anything in your account since Write-N-Cite doesn’t have any features to edit your items.
Logging In To Write-N-Cite:
1. Click RefWorks from the Microsoft Word ribbon.

2. Click Log In.

3. Click "Flow" and then enter your email address and Flow password and click "Login".
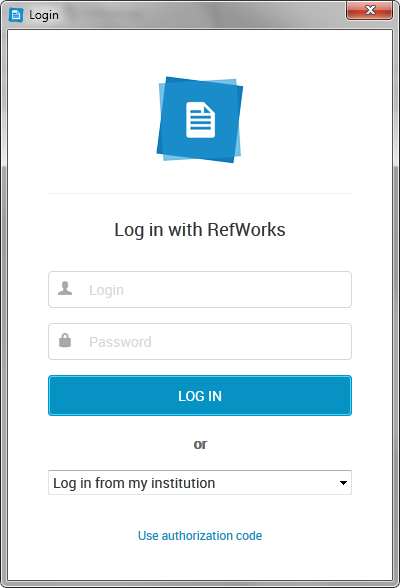
The first time you log in to Write-N-Cite, it will automatically “sync” with your RefWorks library. This may take a few seconds. It is downloading your references and collections. Any time you make changes to your RefWorks items you can click Sync my Database your new and edited items will be added to Write-N-Cite.
During this period, you can still access all of Word’s functionality, but the Write-N-Cite functions will not become active until syncing has finished.
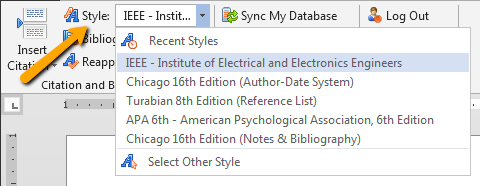
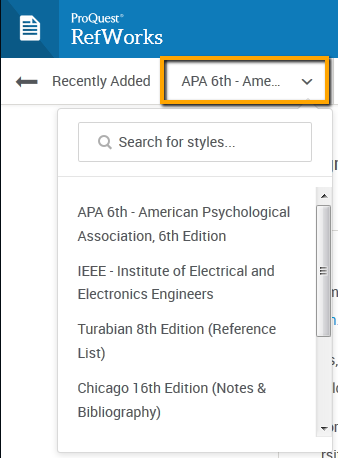
Step 2. Selecting Your Output Style
The first thing you will want to do is select an output style for your document. Any in-text citations or footnotes and your bibliography will be displayed in your document while you write your paper – in the output style you have selected. You can always change the style later if you need to.
1. Click the Style dropdown. You will see a list of RefWorks' recent styles.
2. Click on the style name.
3. You can change your output style and the formatting of your paper at any time by clicking on another Style in the list and selecting a new output style. Access to other Styles can be gained by using Select Other Style at the bottom of the list.
Step 3. Write Your Paper and Inserting Citations or Footnotes and Your Bibliography
Note: You may want to sync your RefWorks library with Write-N-Cite if you have recently added items you want to use in your paper. Click the Sync my database icon to download new or updated items.
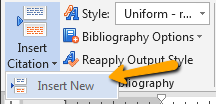
When you are ready to insert an in-text citation or footnote into your paper:
1. Click the Insert Citation and Insert New option to launch the insert/edit citation box. If you have previously used Write-N-Cite, you may see some recently selected citations listed above the Insert New option. You can select citations displayed from this list or access all your references from the Insert New option.
2. Once the Insert/Edit Citation box displays, you can access your items by Collection or by searching. The Search box will search every field.
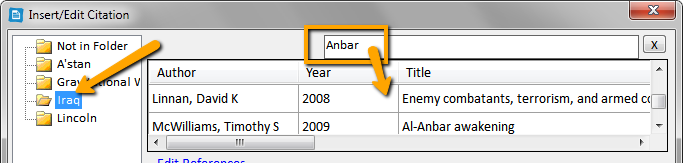
Tip: Use the horizontal scroll bar to see the full title. Right-click on the item and select Show Full Reference Detail to display all fields of information (file attachments are not displayed).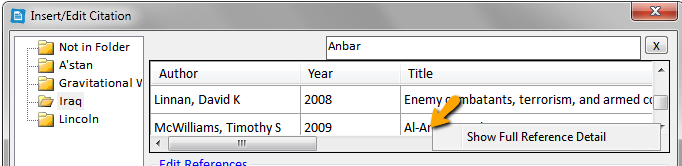
Full Reference View: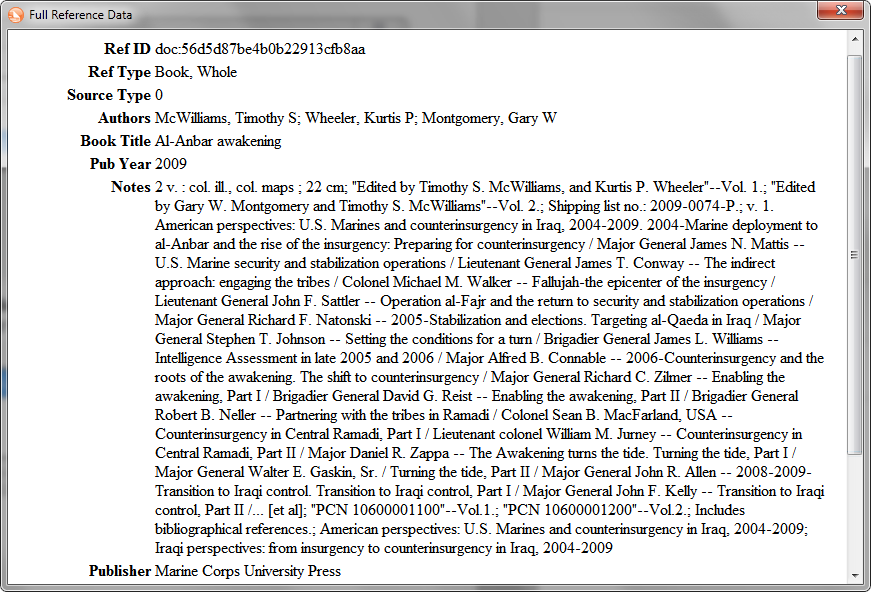
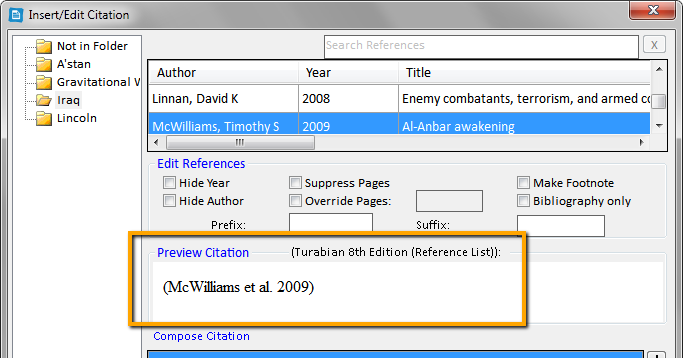
3. Click on the item you wish to insert into your paper. You will see a preview of the formatted citation in your current Output Style.
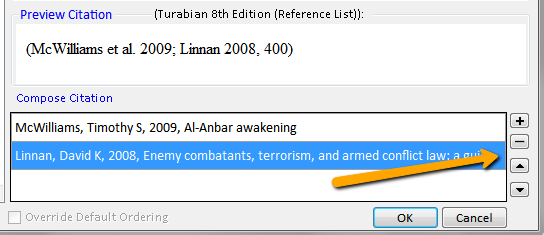
Tip: Add more references to the citation using the plus icon, remove them by using the minus icon, or reorder the references with the up and down arrows in the Compose Citation area.
4. Click OK to insert your formatted citation into your paper.
5. To insert a footnote instead of an in-text citation, click the Make Footnote checkbox in the Edit References area. Once you make a footnote and finish editing the citation, you will not be able to undo this action. However, you can always add a new in-text citation.
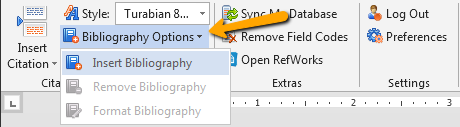
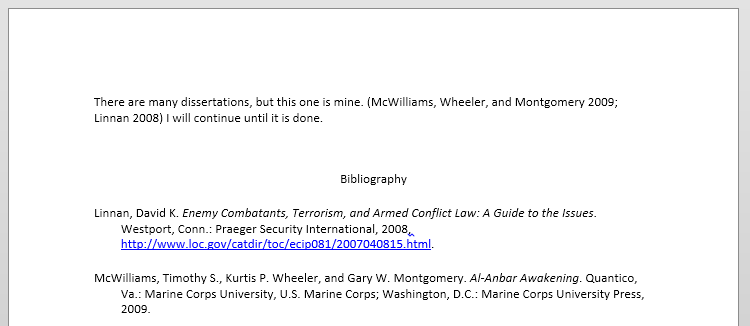
6. You can insert your bibliography anywhere in your paper while you are writing. Click Bibliography Options, Insert Bibliography. Note: the bibliography will be inserted wherever the cursor is in your paper.
You can click Remove Bibliography and re-insert if it you need to change the location.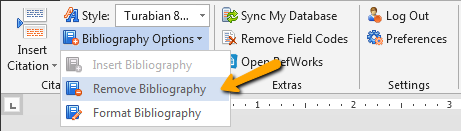
Step 4. Save your formatted paper
Create a Bibliography
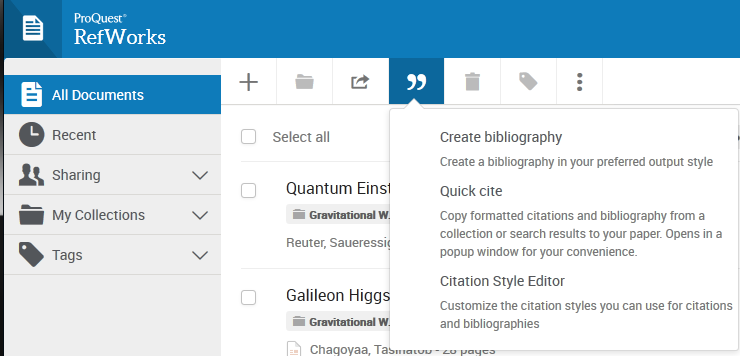
You can easily create a bibliography from the All Documents area, any collection or your search results list.
Navigate to the collection you want to use (or All Documents area or run a search and select items) and click the Create bibliography icon  . You can choose to create a bibliography for selected references or for all of the reference in the collection (or in All Documents if that's the view you are in).
Next, search for your output style and select it. Your formatted bibliography will be displayed in your browser for you to copy and paste into any word processing software.
To use a custom output style from your RefWorks account, click here.
RefWorks and Google Docs
RefWorks offers two optional tools to help you write your paper Write-n-Cite (which works with Microsoft Word) and the RefWorks Add-on for Google Docs (which is covered in this article). You can also create a simple bibliography from your references right in your RefWorks account.
Any additions, changes or deletions you make in your RefWorks account are automatically synced with the Google Docs Add-on.
Note: Changes are NOT made to any in-text citations or the bibliography in your document.
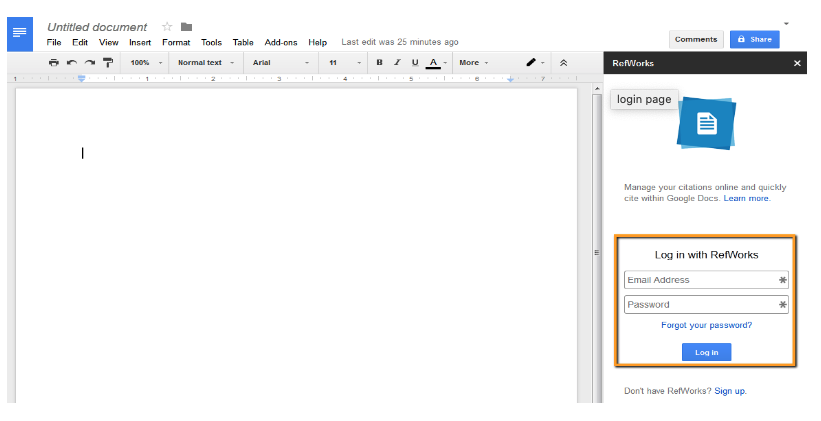
Installing the Google Docs Add-on for RefWorks
- Open a blank document and select “Add-ons”, “Get Add-ons” and search for “ProQuest RefWorks”. Once you find it, just click on the “free” button to add it.

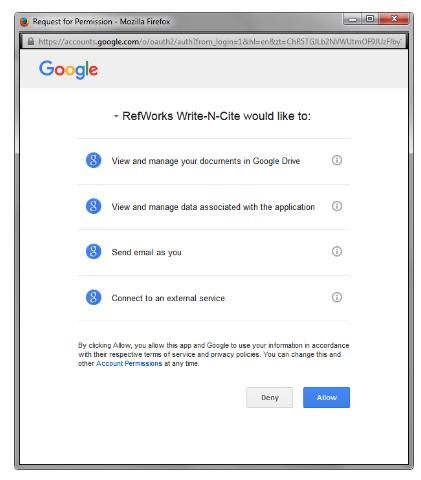
2. You’ll be asked to “accept” certain conditions of using the add-on:
3. Once you have accepted the conditions, you’re brought into your new document and are ready to start writing your paper.
Working with the ProQuest RefWorks Add-on for Google Docs
- Start writing and when you are ready to insert your first citation, select “Add-ons”, “ProQuest RefWorks”, “Manage Citations”.

- If this is your first time using the RefWorks add-on, you’ll be asked to log in to your RefWorks account. If you do not have a RefWorks account, you can sign up using your UniMelb address and receive access.
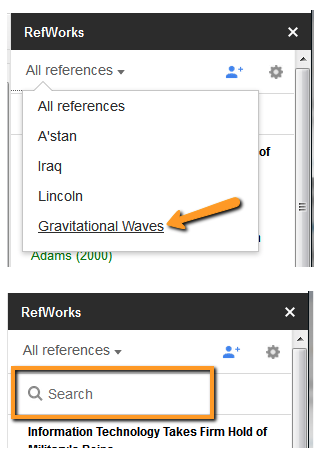
- The right-hand pane will change, defaulting to your RefWorks “All references” view.
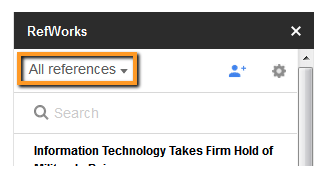
- If you want to work with a RefWorks collection of references, just click on “All references” to see your list of collections. Choose the collection with the references you need for your paper. You can also use the “search” option to search for specific references.
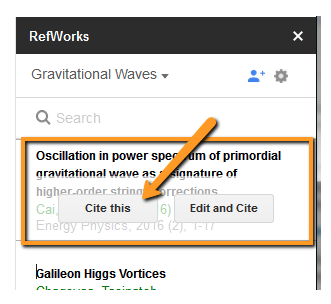
- You can start writing your paper and when you are ready to cite a reference in RefWorks, click on the citation and click the “cite this” button. The in-text citation will be inserted (using the last output style you used in RefWorks).
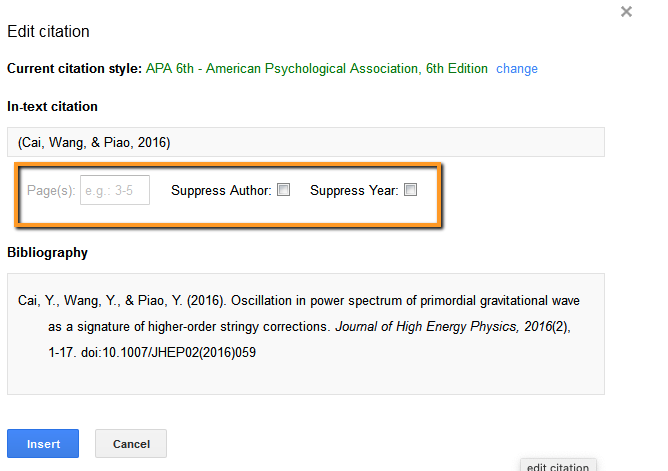
- There is also a citation editing option. Click “Edit and Cite” to add page numbers, hide the author name, or hide the publication year in your in-text citation (dependent upon the output style you are using). You will also see a preview of the in-text citation and your bibliography entry.
Continue to add citations and watch your bibliography update right in front of you.
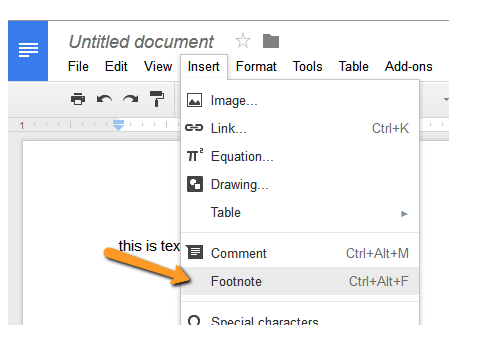
You can also add footnotes (make sure your output style supports them!) by using Google Docs footnote option (Insert, Footnote):
Changing your output style
There are two ways you can change your output style for your paper:
- In the RefWorks pane in your document, click on the “options” icon
 and select “Change citation style”
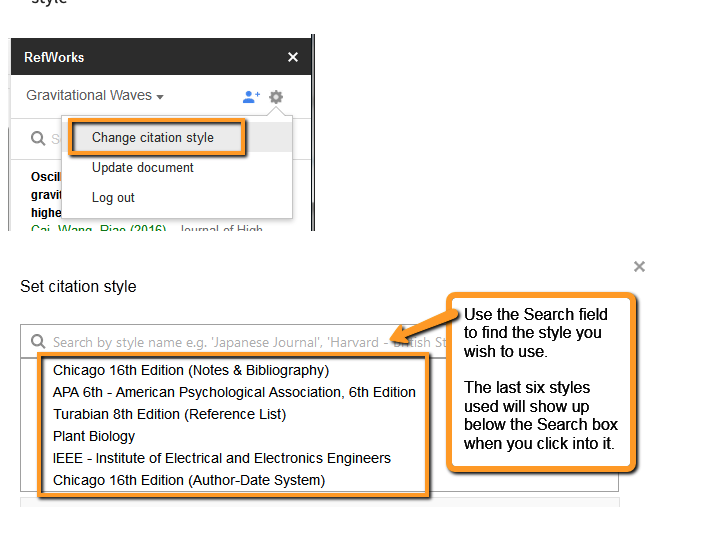
- Or you can select any reference from the list and click the “Cite and Edit” button and change the style:

Note: Custom output styles are currently not accessible.
Deleting or changing citations
- Highlight the citation you wish to delete and use the backspace key or delete key to remove it.
- Insert the new citation (if applicable).
- Click on the “options” icon and select “Update document”. Your document will refresh and the bibliography entry will be removed or updated (if you added a replacement citation).

Any additions, changes or deletions you make in your RefWorks account are automatically synched with the Google Docs Add-on.
Note: changes are NOT made to any in-text citations or the bibliography in your document.
Collaborating with others
Google makes it easy to collaborate with others on your paper. Now you can take that a step further, by collaborating with other RefWorks users!
Share your document with anyone who has a RefWorks account and in addition to adding and editing text to your document, they can also add in-text citations and footnotes from their RefWorks account.
There are two ways you can share your document with others.
To share your document with someone who does NOT have a RefWorks account
1. Click the share icon ![]()
2. Enter the email address of the person you want to share with
3. The person will receive an email with a link to create a RefWorks account and then access your document with the “can edit” permission (you can modify the permission by clicking on the Share button and selecting “can comment” or “can view”)
You can even collaborate using the same set of references by sharing your RefWorks collection with your collaborators. Read more about sharing a collection.
Note: Anyone you share with can also delete the in-text citations you included in your document however, they cannot delete references from your RefWorks account.
To share your document with someone who has a RefWorks account:
- Click the Share button
 in the upper right-hand corner. The “Share settings” box will open with access to several options:
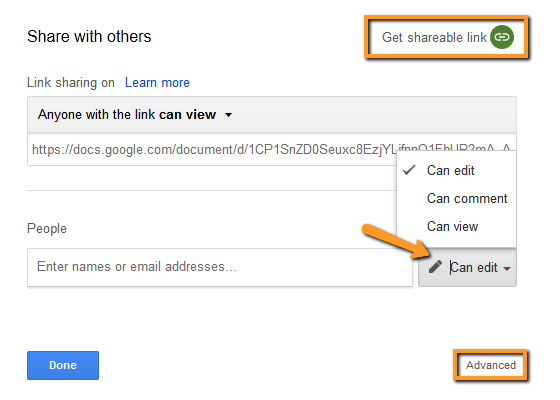
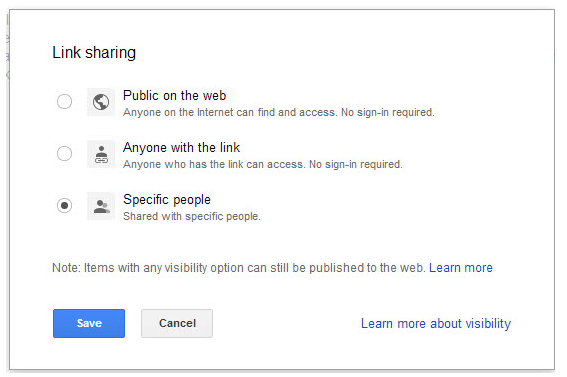
- Via the Advanced settings you can change the access setting if desired (the default setting is “specific people”).
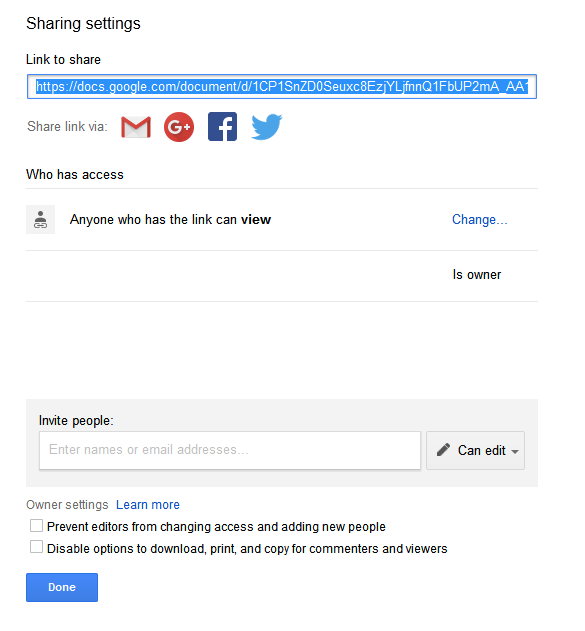
The Change link will allow you to modify how your document is shared.
- Enter the email addresses of the people you wish to share the document with. If they do not have a RefWorks account, they will be asked to create one.
You can even collaborate using the same set of references by sharing your RefWorks collection with your collaborators.
Note: Anyone you share with can also delete in-text citations you’ve included in your document, however, they cannot delete references from your RefWorks account.